
4 min read
OpenID Connect with Nextcloud and Keycloak
Keycloak and Nextcloud are both popular open source software. The first is an identity provider and broker, the second one is collaboration platform. Instead of having multiple accounts on several online platforms, you want to have one identity and log into multiple platforms. This is the job of the OpenID Connect protocol and is supported by Keycloak. In this guide I walk you through the steps of connecting Nextcloud with Keycloak to support a seamless single sign-on experience.
In our scenario we have these hosts and configurations:
- Keycloak server (OpenID Provider)
- host:
login.example.com - realm:
example.com
- host:
- Nextcloud server (Relying Party)
- host:
nextcloud.example.com
- host:
I assume both services are configured and running without issues.
The authentication flow
What we want to achieve is quite common.
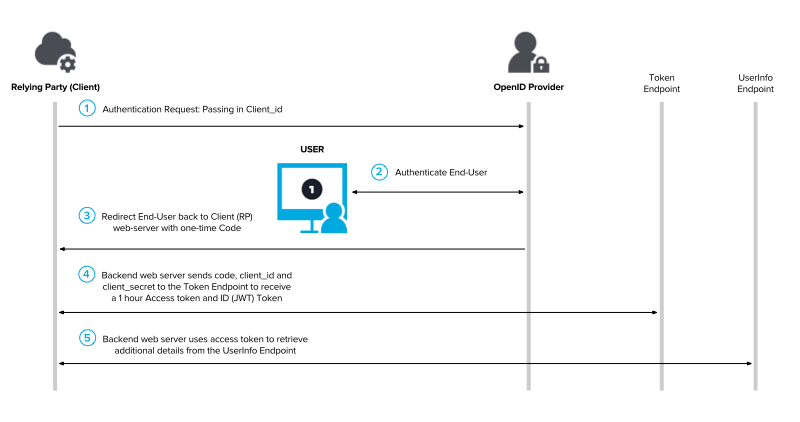
The authentication flow goes like this:
- Nextcloud redirects the user to Keylcoak
- The user authenticates with the Keycloak credentials
- User is redirected back to Nextcloud with a token
- Nextcloud retrieves an access token
- Nextcloud uses the access token to retrieve user information
Setup client in Keycloak
Lets get started by setting up the Keycloak client.
- Open the Keycloak Admin Console
- Select your realm and create a new client Configure > Clients > Create
Client ID: nextcloud.example.com
Client Protocol: openid-connect
Root URL : https://nextcloud.example.com
- Click Save and update these settings for the new client:
Access Type: confidential
- Click Save and open the Roles tab and add a new role:
Role Name: admin
- Return to the clients view and open the Mappers tab
- Click Add Builtin, search for
client rolesand add it - Open the new mapper and make these configurations:
Token Claim Name: roles
Add to userinfo: ON
This mapper will ensure that the JWT-Token contains the user roles at the right location.
- Click Save and open the Credentials tab
- Copy the Secret to an ephermal note
- Open the Scope tab and disable Full Scope Allowed
This will ensure that only the client roles are stored in the token.
- Navigate to Configure > Realm Settings > General tab and click on OpenID Endpoint Configuration
Keep this browser tab open. We need it for the Nextcloud configuration.
Configure social login in Nextcloud
Now it is time to set up the Nextcloud social login.
- Open the App dashboard
- Install the Social Login app
- Navigate to Settings > Administration > Social login
- Set the options according your requirements or check at least these options:
[x] Prevent creating an account if the email address exists in another account
[x] Restrict login for users without mapped groups
- Save the settings
- Click on the Custom OpenID Connect plus button
- Enter the information from the open Keycloak browser tab:
Internal name: keycloak
Title: Example
Authorize url: https://login.example.com/auth/realms/example.com/protocol/openid-connect/auth
Token url: https://login.example.com/auth/realms/example.com/protocol/openid-connect/token
User info URL (optional): https://login.example.com/auth/realms/example.com/protocol/openid-connect/userinfo
Logout URL (optional): https://login.example.com/auth/realms/example.com/protocol/openid-connect/logout?redirect_uri=https%3A%2F%2Fnextcloud.example.com
Client Id: nextcloud.example.com
Client Secret: Copy from ephermal note
Scope: openid
Groups claim (optional): roles
Button style: Keycloak
- Add a mapper with Add group mapping
- Enter in both fields:
admin
If you would choose to let Nextcloud create the required groups from the userinfo, it would prefix all group names with keycloak-. We want to avoid this and therefore have to map every single group in Nextcloud.
- Click on Save at the end of the page
If you get a success message from Nextcloud we are ready to test the login.
Test the login
First we are going to verify the token and userinfo.
- Apply the client admin role to your personal Keycloak account
- Open the command line, update the script below and run it.
# Setttings
KEYCLOAK_HOST=login.example.com
KEYCLOAK_USERNAME=<Keycloak username>
KEYCLOAK_PASSWORD=<Keycloak password>
KEYCLOAK_REALM=<Keycloak realm name>
KEYCLOAK_CLIENT_SECRET=<Keycloak client secret>
CLIENT_ID=nextcloud.example.com

# Get token
TOKEN=$(curl -s \
-d "client_id=$CLIENT_ID" \
-d "client_secret=$KEYCLOAK_CLIENT_SECRET" \
-d "username=$KEYCLOAK_USERNAME" \
-d "password=$KEYCLOAK_PASSWORD" \
-d "grant_type=password" \
"https://$KEYCLOAK_HOST/auth/realms/$KEYCLOAK_REALM/protocol/openid-connect/token" | jq -r '.access_token')

# Use token to get userinfo
curl \
  -H "Authorization: bearer $TOKEN" \
  https://$KEYCLOAK_HOST/auth/realms/$KEYCLOAK_REALM/protocol/openid-connect/userinfo
If you get a JSON formatted response from the userinfo endpoint everything looks good. Otherwise let me know in the comments.
- Open a private browser window and open Nextcloud
- Click on Login with Example
- Login with the Keycloak account
If you see a the Nextcloud intro, congratulation! You have successfully used Keycloak to log into Nextcloud with OpenID Connect.
Final note: The great benefit of using OpenID Connect over SAML is that you can still set a password for the user account and login using the email.
Issues
Cryptic Username
By default the username is generated using the keycloak- prefix, the Keycloak user id and the actual Keycloak username. To avoid this schema you need to override the sub property of the userinfo. Create a mapper for the client:
Name: sub
Mapper Type: User Prooperty
Property: username
Token Claim Name: sub
If a user logs into Nextcloud the username will be keycloak-$KEYCLOAK_USENRAME.
Further Readings
Learn more about Keycloak:
Category: identity-and-access-managementTags: keycloak , nextcloud , openid-connect , oauth
Edit Page / Show Statistic