4 min read
Role based access control for multiple Keycloak clients
Role based access control (RBAC) is a common feature in identity and access management (IAM) systems. Granting access to applications by assigning roles to a selection of users is the proper way to manage access permissions.
In this guide I will show you how this can be implemented with Keycloak. We will create a authentication flow that checks if a user is eligible to access the client. This authentication flow can be applied to any Keycloak client.
Lets assume that we have set up the following Keycloak resources:
Keycloak realm: example.com
Openid-connect client: app.example.com
Now are going implement a custom authentication flow script. Therefore we have to enable the script feature for Keycloak.
Enable scripts for Keycloak
Run the Keycloak server with the following option:
-Dkeycloak.profile.feature.upload_scripts=enabled
If you run Keycloak with Docker you can pass the option as command argument.
docker run -p 8080:8080 jboss/keycloak -Dkeycloak.profile.feature.upload_scripts=enabled
In the log you should see these entries:
11:33:23,596 WARN  [org.keycloak.common.Profile] (ServerService Thread Pool -- 62) Deprecated feature enabled: upload_scripts
11:33:23,598 WARN  [org.keycloak.common.Profile] (ServerService Thread Pool -- 62) Preview feature enabled: scripts
Next we are going to create the client role.
Create client role
In your realm navigate to Configure > Clients > app.example.com > Roles > Add Role. Define access as the role name.
Assign this role to users which should be allowed to access the client.
Now it is time to update the authentication flow.
Keycloak flow
Navigate to Configure > Authentication > Flow and select the Browser flow. Make a copy of the flow and set as New Name browser role access control.
At the end of the Browser Role Access Control Forms row click on Actions > Add execution. Select Script from the provider list and hit save. Move the new entry with the arrow button up until it is below the Username Password Form row. Then set the requirement to REQUIRED for the Script row.
Now we will add the script that checks if a user has a client role. Click on Actions > Config at the end of the Script row. Update the script as showed below.
Alias: hasClientRole
Script Name: hasClientRole
Script Source:
/*
 * Template for JavaScript based authenticator's.
 * See org.keycloak.authentication.authenticators.browser.ScriptBasedAuthenticatorFactory
 */

FormMessage = Java.type('org.keycloak.models.utils.FormMessage');

/**
 * An example authenticate function.
 *
 * The following variables are available for convenience:
 * user - current user {@see org.keycloak.models.UserModel}
 * realm - current realm {@see org.keycloak.models.RealmModel}
 * session - current KeycloakSession {@see org.keycloak.models.KeycloakSession}
 * httpRequest - current HttpRequest {@see org.jboss.resteasy.spi.HttpRequest}
 * script - current script {@see org.keycloak.models.ScriptModel}
 * authenticationSession - current authentication session {@see org.keycloak.sessions.AuthenticationSessionModel}
 * LOG - current logger {@see org.jboss.logging.Logger}
 *
 * You one can extract current http request headers via:
 * httpRequest.getHttpHeaders().getHeaderString("Forwarded")
 *
 * @param context {@see org.keycloak.authentication.AuthenticationFlowContext}
 */
function authenticate(context) {

    var username = user ? user.username : "anonymous";
    LOG.info(script.name + " trace auth for: " + username);

    var client = session.getContext().getClient();
    //var rolesClient = user.getClientRoleMappings(client);
    var roleModel = client.getRole("access");

    // if (rolesClient.isEmpty()) {
    if (!user.hasRole(roleModel)) {

        context.forkWithErrorMessage(new FormMessage('label', 'User is not allowed to access this client.'));
        return;
    }

    context.success();
}
Update 1: The script has been updated to check if user actually has the role access and not only any role of the client. This change was proposed in the comments by @rogier.
The script retrieves the roles mappings of the current client from the session context and if the user has not assigned any roles it will deny access.
Just to make sure that the flow is setup correctly have a look here:
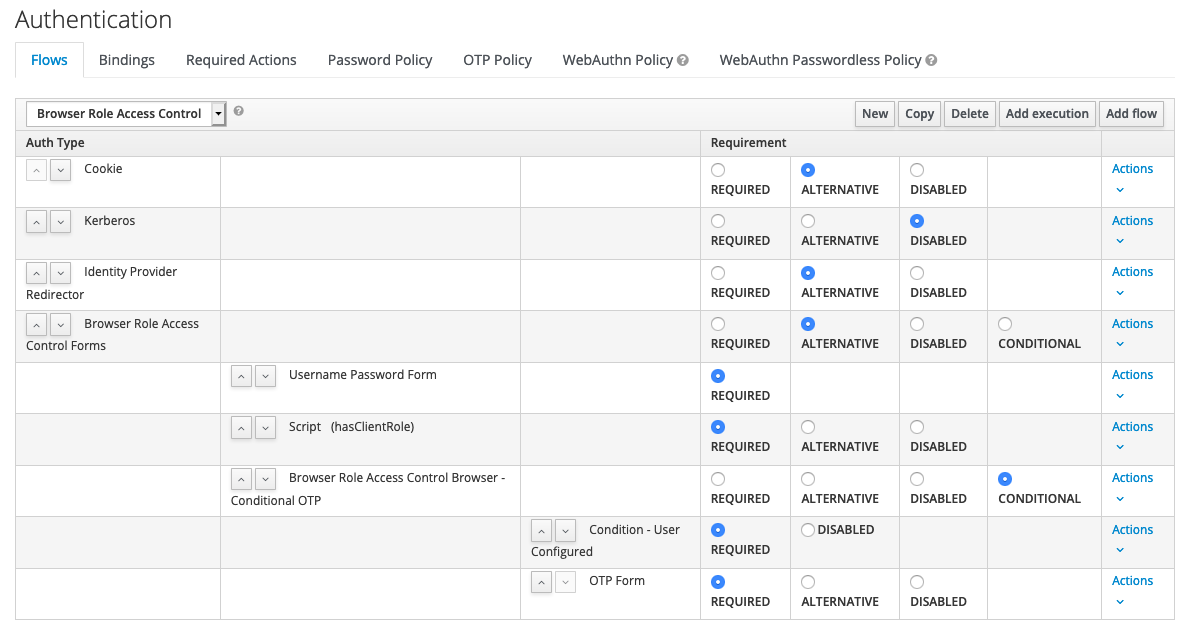
As the final step navigate to Configure > Clients > app.example.com > Settings > Authentication Flow Overrides and select for Browser Flow the new authentication flow.
Test the login
Testing is quite simple. Create two users. One user has the client role access assigned and the other user doesn’t. Open your client an initiate the auth process. Log in with the first user and the auth flow should work without interruption. Log in with the second user and you should see the error message User is not allowed to access this client..
Categories: Identity and Access ManagementTags: rbac , keycloak , clients
Edit this page
Show statistic for this page