
8 min read
Build a stateful serverless Telegram bot - Part 2
In part 1 of this tutorial we’ve setup the initial folder structure for our chatbot and made a first deployment. In part 2 we are going to teach the bot some new commands and implement a state management for the chat dialog chain.
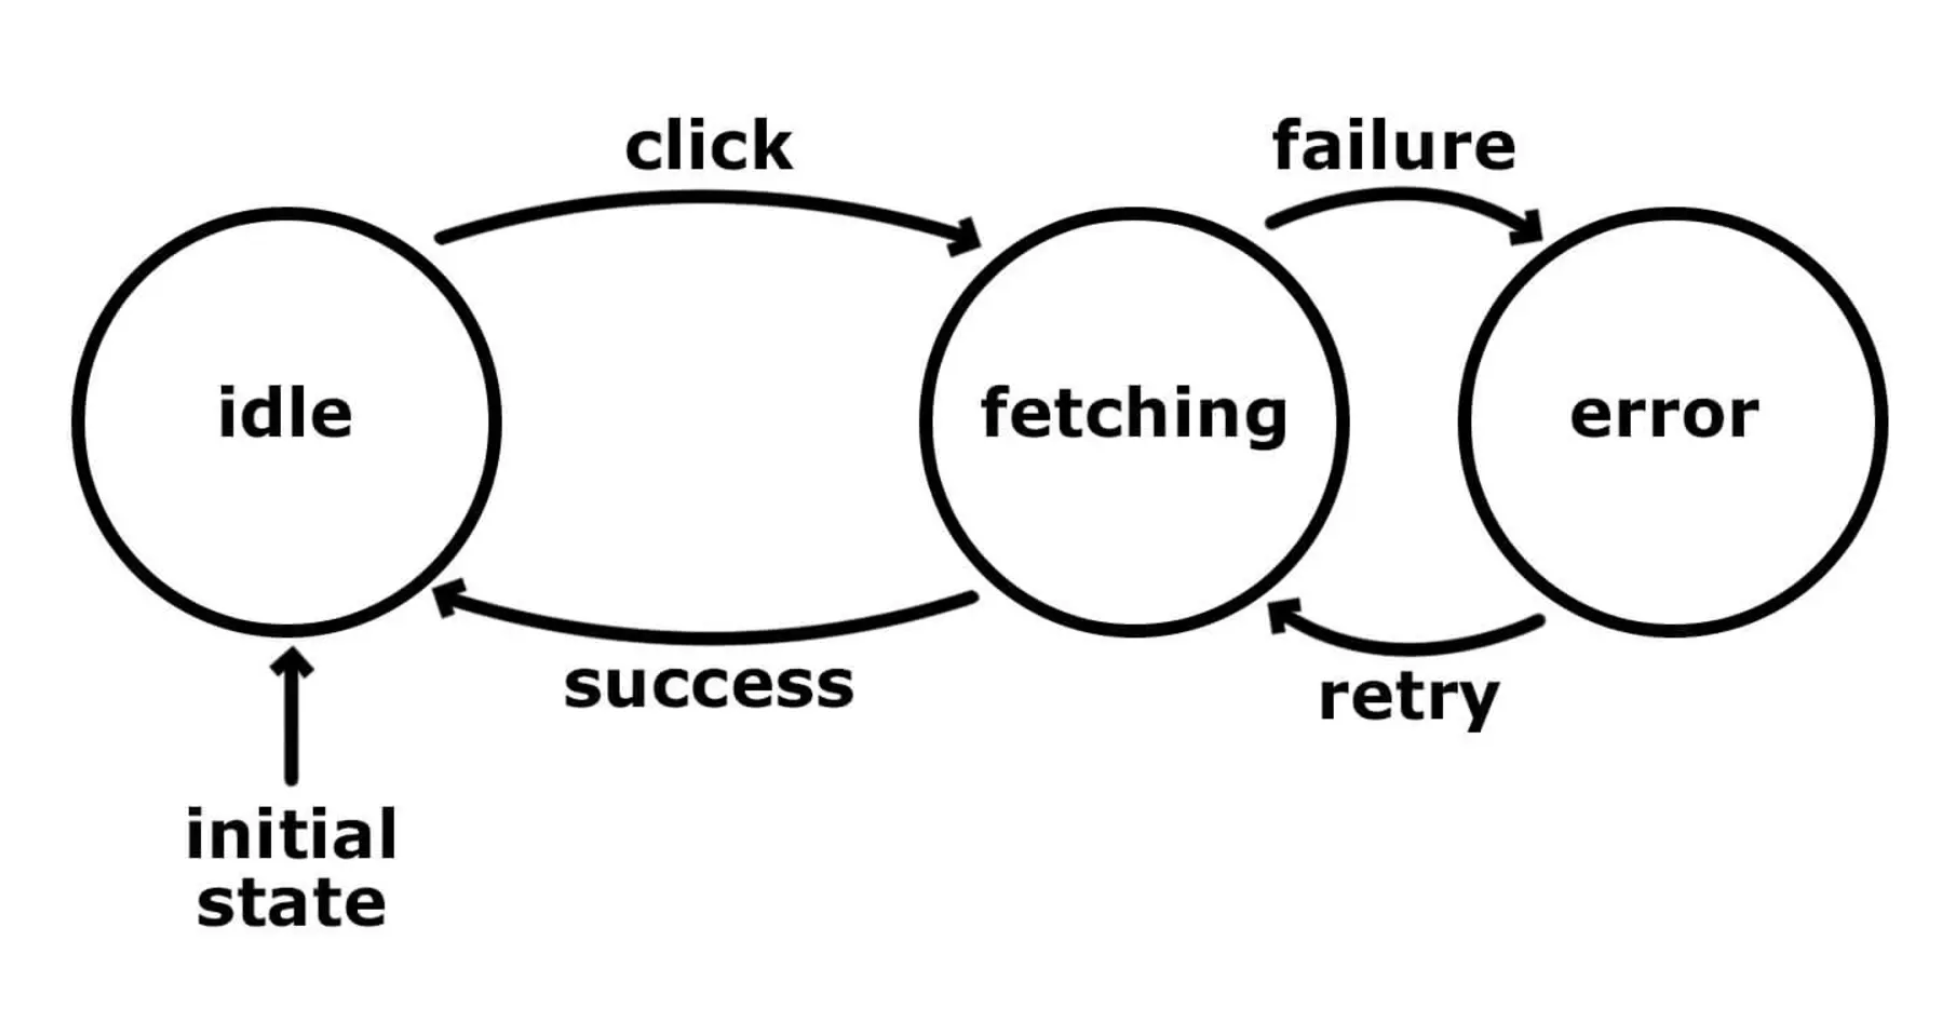
When thinking about a dialog flow think of a state machine. A state machine is a set of states and transitions. Every action of sending a message, pressing a button or replying to a question in a chatbot dialog is a transition. A state is a set informations that the bot requires to complete his tasks. Here is an example of a state machine:
In the tutorial we will implement the /newreminder command which initiates the following dialog with the user:
- transition: send
/newremindercommand - state: ask name
- transition: write name
- state: ask schedule
- transition: set schedule
- state: confirm
- transition: reset state
- transition: send another command
Overview
The tutorial is separated into two parts:
- Register a bot
- Setup the now project
- Add a /start reply
- Deploy
Part 2:
- Setup redis connector
- Add /newreminder reply
- Add /listreminders reply
- Deploy
Setup redis connector
As mentioned we will use redis as our database. There we store state data for each user.
You can get a free redis instance from RedisLabs.
Once you’ve setup the database you are ready to create a database connector for the example bot.
Enter the db folder and create a new package.
cd db && npm init
Create the index.js file.
db/index.js
var redis = require('redis')
var bluebird = require('bluebird')

// Promisify all redis methods
bluebird.promisifyAll(redis)

// Create cached connection variable
let cachedClient = null

const createClient = (uri) => {
  // If cached client exists return it
  if (cachedClient) {
    return cachedClient
  }

  // Parse url and get pass
  const parsedUrl = new URL(uri)

  // Otherwise create a new client
  var client = redis.createClient(uri)
  client.auth(parsedUrl.username)
  cachedClient = client

  // Return new client
  return client
}

module.exports = createClient(process.env.REDIS_URI)
This module exports a redis client. Naturally you want to reuse an open connection to the database, but due to the serverless nature of now, you do not have access to the lifecycle of an object. Thus we have to create cached object for the client. Assuming the serverless instance went cold and is spun up again, the module creates a new object. If the module is executed during a hot phase, the client object is reused.
In addition to the Telegram token the redis uri must be added to the environment file.
.env
TELEGRAM_TOKEN=<your telegram bot token goes here>
REDIS_URI=redis://<password>@<host>:<port>/0
Export the variables.
export $(cat .env | xargs)
And create a now secret.
now secrets add example_bot_redis_uri $REDIS_URI
Then we add the db package to the root project.
package.json
  ...
  "dependencies": {
    ...
    "db": "./db"
  },
  ...
And install it.
npm install
For storing and retrieving data we need a new module.
api/redis.js
const db = require('db')

module.exports = {
  keys: async (key) => {
    return db.keysAsync(key)
  },
  set: async (key, value) => {
    return db.setAsync(key, value)
  },
  get: async (key) => {
    return db.getAsync(key)
  },
  del: async (key) => {
    db.delAsync(key)
  },
  hkeys: async (hash) => {
    return db.hkeysAsync(hash)
  },
  hset: (hash, field, value) => {
    return db.hset(hash, field, value)
  },
  hget: async (hash, field) => {
    return db.hgetAsync(hash, field)
  },
  hdel: async (hash, field) => {
    return db.hdelAsync(hash, field)
  },
  incr: async (key) => {
    return db.incrAsync(key)
  }
}
This module exports common redis commands.
Add /newreminder reply
It is time to teach our bot a new command. This following module is quite complex. Make sure to read the comments, especially the “Set state” comments.
api/new-reminder.js
const sendMessage = require('./send-message')
const { set, del, get, hset, incr } = require('./redis')
const Reminder = require('./reminder')
const { scheduleOptions, scheduleButtons } = require('./options')

// Processes messages matching /newreminder
module.exports = async (message, ctx) => {
  // Set some ids
  const chatId = message.chat.id
  const reminderEditKey = `edit:${chatId}:reminder`
  const requestId = `request:${chatId}`
  const reminderSetKey = `reminder:${chatId}`

  if (ctx.request === '/newreminder/name') {
    await sendMessage({
      chat_id: chatId,
      text: `Your reminder name is: ${message.text}`
    })

    // Create new reminder and store plant name
    const reminder = new Reminder(message.text)
    await set(reminderEditKey, JSON.stringify(reminder))

    // Ask for the interval
    await sendMessage({
      chat_id: chatId,
      text: 'At which interval would you like to be remindend?',
      reply_markup: {
        inline_keyboard: [scheduleButtons]
      }
    })

    // Set state
    await set(requestId, '/newreminder/schedule')
  }

  if (ctx.request === '/newreminder') {
    // Send message
    await sendMessage({
      chat_id: chatId,
      text: 'Name your plant:'
    })

    // Set state
    await set(requestId, '/newreminder/name')
  }

  if (ctx.request === '/newreminder/schedule') {
    await sendMessage({
      chat_id: chatId,
      text: `You have chosen: ${scheduleOptions[message.data].display}`
    })

    // Get reminder edit
    var reminder = Object.setPrototypeOf(JSON.parse(await get(reminderEditKey)), Reminder.prototype)

    // Set schedule
    reminder.setSchedule(message.data)

    // Generate Id
    const reminderKey = await incr('key:reminder')

    // Save reminder
    await hset(reminderSetKey, reminderKey, JSON.stringify(reminder))

    await sendMessage({
      chat_id: chatId,
      text: 'Your reminder has been saved!'
    })

    // Del reminder edit
    await del(reminderEditKey)

    // Delete request state
    await del(requestId)
  }
}
In this module we have implemented the dialog flow described in the intro. Assuming the user enters the command /newreminder, a message is forwarded to this module. A transition is matched according to the request state. Every transitions sets the expected state in the database. The final transition deletes the request state.
The inline keyboard of the Telgram API expects some heavy markup. Lets externalize the data into a separated module.
api/options.js
const scheduleOptions = {
  daily: {
    display: 'Daily',
    days: 1
  },
  weekly: {
    display: 'Weekly',
    days: 7
  },
  twoweeks: {
    display: 'Every 2 weeks',
    days: 14
  },
  monthly: {
    display: 'Monthly',
    days: 30
  }
}

const scheduleButtons = ['daily', 'weekly', 'twoweeks', 'monthly'].map(key => {
  return {
    text: scheduleOptions[key].display,
    callback_data: key
  }
})

module.exports = {
  scheduleOptions,
  scheduleButtons
}
Add /listreminders reply
We are getting close to finish the second draft of our bot. The user can create reminders, but sure he wants to have an overview.
api/list-reminders.js
const sendMessage = require('./send-message')
const { hkeys, hget } = require('./redis')
const Reminder = require('./reminder')
const { scheduleOptions } = require('./options')

// Processes messages matching /listreminders
module.exports = async (message) => {
  const chatId = message.chat.id
  const reminderSetKey = `reminder:${chatId}`

  // Get all existing reminders
  const reminderKeys = await hkeys(reminderSetKey)

  if (reminderKeys.length >= 1) {
    // Create printable list for reminder set
    const reminderPrint = await Promise.all(reminderKeys.map(async key => {
      // Get details of reminder
      const reminder = Object.setPrototypeOf(JSON.parse(await hget(reminderSetKey, key)), Reminder.prototype)

      // Return printable list entry
      return `\n${reminderKeys.indexOf(key) + 1}) ${reminder.getName()} (${scheduleOptions[reminder.getSchedule()].display})`
    }))

    await sendMessage({
      chat_id: chatId,
      text: `Here are your registered reminders:${reminderPrint}`
    })
  } else {
    await sendMessage({
      chat_id: chatId,
      text: 'You do not have any reminder yet. Use /newreminder to add one.'
    })
  }
}
This command handler simply prints all registered reminders.
For reminder object interaction we use a JavaScript class (aka just another prototype). Here is the class definition:
api/reminder.js
class Reminder {
  constructor (name) {
    this.name = name
  }

  setName (value) {
    this.name = value
  }

  getName () {
    return this.name
  }

  setSchedule (value) {
    this.schedule = value
  }

  getSchedule () {
    return this.schedule
  }
}

module.exports = Reminder
Now we connect our command modules with the message processor.
api/index.js
// Load env config
require('dotenv').config()

// Import modules
const start = require('./start')
const newreminder = require('./new-reminder')
const listreminders = require('./list-reminders')
const { get } = require('./redis')
const sendMessage = require('./send-message')

module.exports = async (req, res) => {
  console.log('BODY', req.body)

  // Check if Telegram message
  if (req.body && (req.body.message || req.body.callback_query)) {
    // Get message object
    var message = {}
    if (req.body.message) {
      message = req.body.message
    }
    // Callback query depends on request
    if (req.body.callback_query) {
      message = req.body.callback_query.message
      message.data = req.body.callback_query.data

      // Answer callback query
      sendMessage({
        callback_query_id: req.body.callback_query.id
      }, 'answerCallbackQuery')
    }

    // Build context
    const ctx = {
      request: await get(`request:${message.chat.id}`)
    }

    // Request is either current state if set or message text
    ctx.request = ctx.request || message.text

    // Match text request
    if (ctx.request.match('/start(.*)')) {
      await start(message, ctx)
    }

    if (ctx.request.match('/newreminder(.*)')) {
      await newreminder(message, ctx)
    }

    if (ctx.request.match('/listreminders(.*)')) {
      await listreminders(message, ctx)
    }
  }

  // Send default message
  res.end('This is the ExampleBot API.')
}
If a request state is already set, the bot will dismiss the message text as request path. Further the handler for our new commands have been added.
From here you should see where this is going. You can now easily add new commands and dialogs. Simply create a new command module and register the handler in the index file. Use the redis commands to manage the state of your dialog.
Deploy
Before we deploy the example ensure that the new environment variable is propagated to the deployment.
now.json
{
    "env": {
      "TELEGRAM_TOKEN": "@bunkr_bot_telegram_token",
      "REDIS_URI": "@bunkr_bot_redis_uri"
    }
  }
If done run the now command.
now --prod
If the deployment was successful open Telegram and start chatting using the new commands 😁.
Next
Now where to go from here? If you want to build a useful bot sure we have to teach him a lot more. Here are some ideas:
- Checkout my bot code: GitHub - HydroMeBot
- Add additional commands (modify, delete)
- Write tests for the modules
- Setup a reminder notificator that runs daily
- Integrate a natural language processor
Tags: telegram , chatbot , serverless , stateful , redis , github-action , now
Edit Page / Show Statistic