4 min read
Superb Java development with Gradle, Hibernate, FlywayDB, JavaFX and Eclipse – Part 2
As promised here’s the sequel to my last tutorial: Part 1
This time we create a basic rich application with JavaFX. It will be quite simple, but still a good example to show how you can structure a complex project according to MVC.
Update
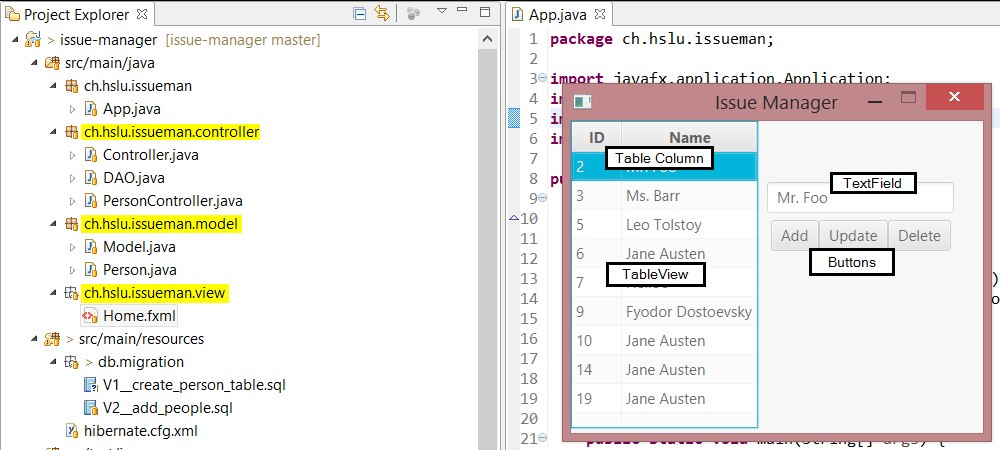
We will start with a refresh of the file structure. The picture below shows yellow marked the new packages and directories. On the right side is a preview of the application window labeled with the type of each component.

- Create the new packages.
- Move the files to their new folders. Eclipse will automatically update the namespace and import commands.
- In the hibernate configuration file update the mapping property.
hibernate.cfg.xml
<mapping class="ch.hslu.issueman.model.Person"/>
- Finally create the JavaFX view file
Home.fxmlin the view directory. We will update this file later.
Install
To create the visual layout I’ve used JavaFX Scene Builder.
Please install this tool, we will need to edit the Home.fxml file.
Coding - Controller
To connect the view with the Person Controller we have to provide scene builder objects and methods. I assume you’ve completed the first tutorial and will only show the changes to file.
PersonController.java - begin
import java.net.URL;
import java.util.List;
import java.util.ResourceBundle;
import javafx.collections.FXCollections;
import javafx.fxml.FXML;
import javafx.fxml.Initializable;
import javafx.scene.control.Button;
import javafx.scene.control.TableColumn;
import javafx.scene.control.TableView;
import javafx.scene.control.TextField;
import javafx.scene.control.cell.PropertyValueFactory;
import ch.hslu.issueman.model.Person;
A lot of new dependencies required by JavaFX.
At the end of the file before the closing } inser the following snippets.
	@FXML
	private Button btAdd;

	@FXML
	private Button btUpdate;

	@FXML
	private Button btDelete;

	@FXML
	private TextField txName;

	@FXML
	private TableView<Person> tvPerson;

	@FXML
	private TableColumn<Person, Integer> tcId;

	@FXML
	private TableColumn<Person, String> tcName;
These objects allows us to set and get values from the application interface.
	@Override
	public void initialize(URL arg0, ResourceBundle arg1) {
		tcId.setCellValueFactory(new PropertyValueFactory<Person, Integer>("id"));
		tcName.setCellValueFactory(new PropertyValueFactory<Person, String>("name"));
		refreshPersonTable();
	}
Whenever the application is startet the initialize method will be called. In this function we tell the table view column which value of the person it has to display and also call the refreshPersonTable method which is added next.
	public void refreshPersonTable(){
		tvPerson.setItems(FXCollections.observableArrayList(getAll()));
	}
In this method we feed the table view with a person array.
	@FXML
	public void clickTableView(){
		txName.textProperty().set(tvPerson.getSelectionModel().getSelectedItem().getName());
	}
As you can see there’s a FXML-Annotation as well. This tag allows us to connect an event added by the scene build with a function in the controller. Whenever a row is clicked in the table view we load the content to the form part (if you have got more than one field its recommanded to store the chosen object in a temporary variable).
	@FXML
	public void clickAdd(){
		controller.persist(new Person(txName.getText()));
		refreshPersonTable();
	}

	@FXML
	public void clickUpdate(){
		Person p = tvPerson.getSelectionModel().getSelectedItem();
		p.setName(txName.getText());
		controller.update(p);
		refreshPersonTable();
	}

	@FXML
	public void clickDelete(){
		controller.delete(tvPerson.getSelectionModel().getSelectedItem());
		refreshPersonTable();
	}
Some more event methods for the buttons.
Design
Designing the user interface is very easy.

- Open the
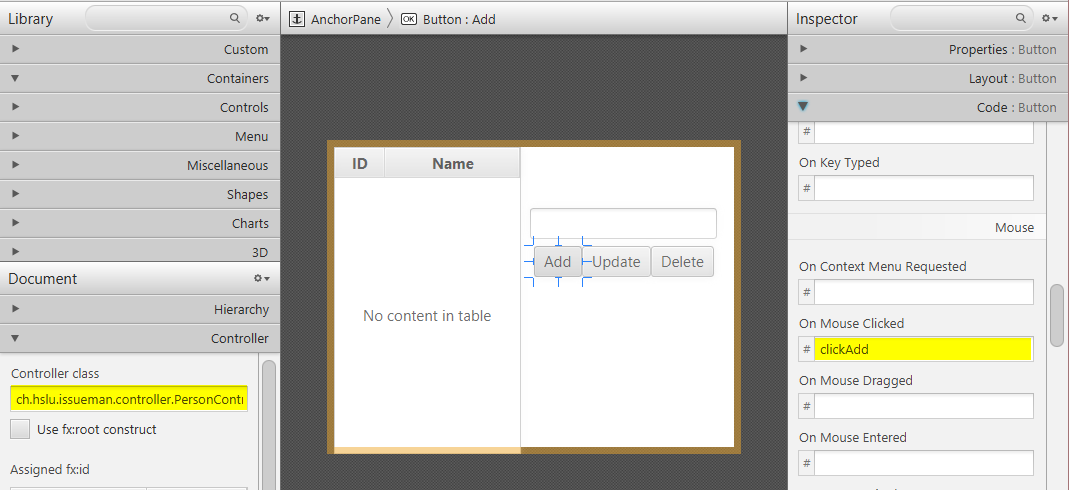
Home.fxmlfile with scene builder. - Connect the scene with the PersonController.
- Add the components showed in the preview and connect them with the fxml objects and methods.
If you don’t know how to accomplish that yet you can copy the fxml definitions below.
Home.fxml
<?xml version="1.0" encoding="UTF-8"?>

<?import javafx.scene.image.*?>
<?import javafx.scene.effect.*?>
<?import javafx.scene.paint.*?>
<?import javafx.scene.control.*?>
<?import javafx.scene.text.*?>
<?import java.lang.*?>
<?import javafx.scene.layout.*?>
<?import javafx.scene.layout.AnchorPane?>

<AnchorPane maxHeight="-Infinity" maxWidth="-Infinity" minHeight="-Infinity" minWidth="-Infinity" prefHeight="300.0" prefWidth="400.0" xmlns="http://javafx.com/javafx/8" xmlns:fx="http://javafx.com/fxml/1" fx:controller="ch.hslu.issueman.controller.PersonController">
   <effect>
      <Glow />
   </effect>
   <children>
      <TableView fx:id="tvPerson" onMouseClicked="#clickTableView" prefHeight="307.0" prefWidth="187.0">
         <columns>
            <TableColumn fx:id="tcId" prefWidth="50.0" text="ID" />
            <TableColumn fx:id="tcName" prefWidth="135.0" text="Name" />
         </columns>
      </TableView>
      <Button fx:id="btAdd" layoutX="200.0" layoutY="99.0" mnemonicParsing="false" onMouseClicked="#clickAdd" text="Add" />
      <Button fx:id="btUpdate" layoutX="248.0" layoutY="99.0" mnemonicParsing="false" onMouseClicked="#clickUpdate" text="Update" />
      <Button fx:id="btDelete" layoutX="317.0" layoutY="99.0" mnemonicParsing="false" onMouseClicked="#clickDelete" text="Delete" />
      <TextField fx:id="txName" layoutX="196.0" layoutY="61.0" />
   </children>
</AnchorPane>
And we are almost done.
Coding - Application
To launch the whole scene we have to update the App.java code as showed below.
App.java
package ch.hslu.issueman;

import javafx.application.Application;
import javafx.fxml.FXMLLoader;
import javafx.stage.Stage;
import javafx.scene.Scene;

public class App extends Application {
	@Override
	public void start(Stage primaryStage) {
		try {
			primaryStage.setResizable(false);
			primaryStage.setTitle("Issue Manager");
			primaryStage.setScene(new Scene(FXMLLoader.load(getClass().getResource("view/Home.fxml"))));
			primaryStage.show();
		} catch(Exception e) {
			e.printStackTrace();
		}
	}

	public static void main(String[] args) {
		launch(args);
	}
}
Hurray! We are done! You can run the application now and should be able to add, edit and delete people from the list all whilst they are stored in the MySQL database.
Source
You can download the source code of the project here: https://codeberg.org/janikvonrotz/issue-manager/releases/tag/1.1
Categories: Software developmentTags: application , fxml , hibernate , java , javafx , tutorial
Edit this page
Show statistic for this page