9 min read
Superb Java development with Gradle, Hibernate, FlywayDB, JavaFX and Eclipse - Part 1
Wow that’s the best Java tutorial I’ve seen so far!
-You in a few minutes.
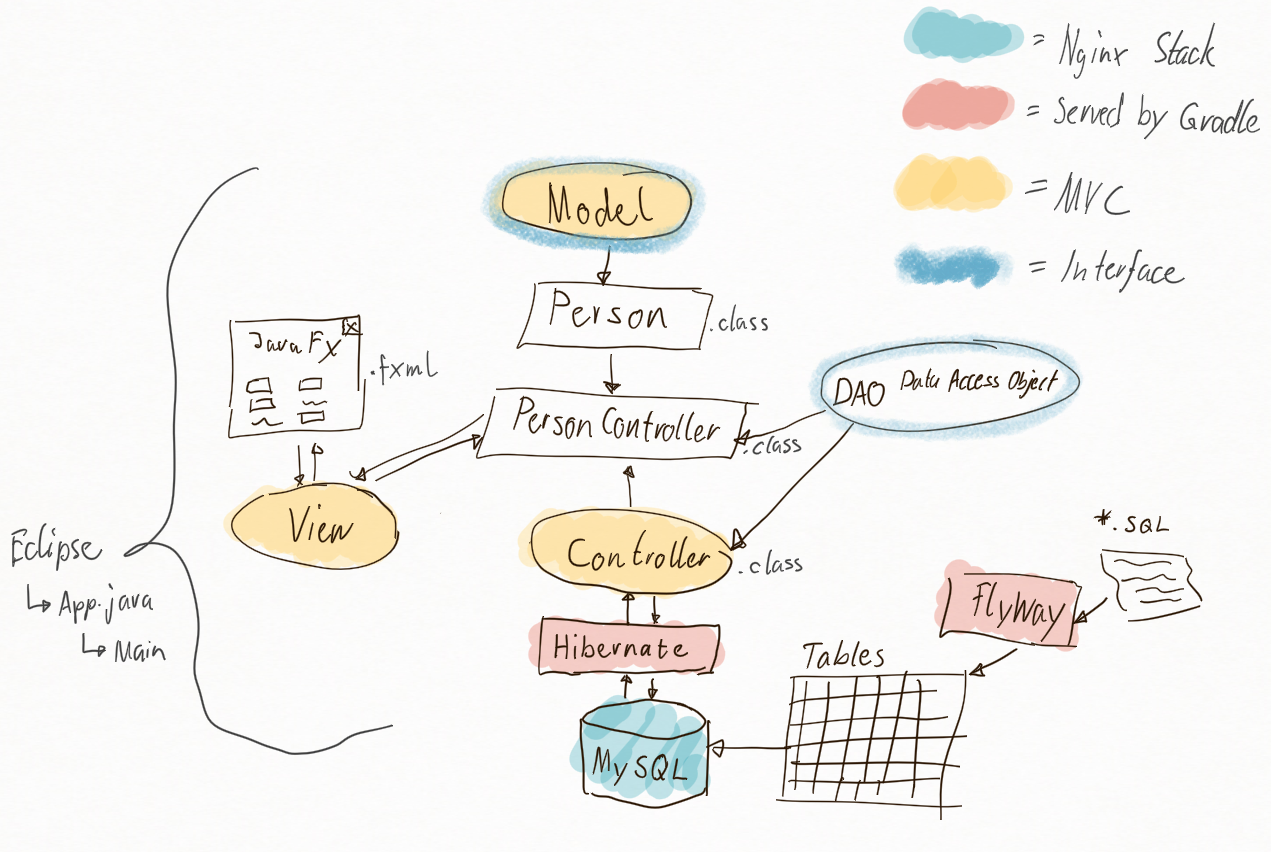
Sounds selfish, doesn’t it? Well it has the right to be, it took me 2 hours to write that! Don’t hesitate now and turn on your dev machine. After this tutorial you have to rethink your Java development process and if you don’t have one yet this is the best place to start. I will show you the most advanced tools to speed up your Java development environment and collaboration capabilities. In this tutorial we are going to develop a simple MVC (Model, View, Controller) application ruled by the DRY (Don’t repeat yourself) approach.
The crappy picture below shows what’s going on according to my brain.
So what do I excepect from you? Well, make sure you know at least a little bit about the following topics:
- Java Collection Framework
- Java Classes and Interfaces
- Java Development with Eclipse
- MySQL database and SQL scripts
- Feeling comfortable with the command line
Let’s get startet with the tools. You don’t have to install them yet, first I will explain them in detail.
- Gradle: A task runner and package manager for your Java project (in case you’re a web developer that would be bower and grunt).
- Hibernate ORM: Object Relation Manager that simplifies database transactions by applying an abstraction layer.
- Flyway: An awesome database migration tool (works perfect within a team and git as version control).
- JavaFX: Framework for rich application.
- Eclipse: The development IDE of your choice.
- MySQL server: OpenSource database server.
Got it? Now we are going to install some stuff.
Installation
- Start with MySQL. The easiest way to get MySQL on your computer is to install a whole web development stack. They usually come with phpmyadmin which is greate to view your database content and other usefull tools preinstalled. I recommand the Nginx Stack by Bitnami.
- Next, if not done yet, install Eclipse.
- And finally get Gradle to run.
As told Gradle is our servant for the project. Follow these steps to set up our project directory and dependencies.
- Create a project folder somewhere on your disk
C:/../<project>. - Open the command line (on windows please use PowerShell) and open the project folder
cd C:/../<project>. - In the project folder create a file named build.gradle.
- In the order as showed below, paste the snippets into the file.
build.gradle - start
buildscript {
    repositories {
        mavenCentral()
    }
    dependencies {
        classpath 'mysql:mysql-connector-java:5.1.34'
        classpath 'org.flywaydb:flyway-gradle-plugin:3.1'
    }
}
Adds the Flyway database migration tool to your gradle task library.
apply plugin: 'java'
apply plugin: 'eclipse'
apply plugin: 'flyway'
Gradle plugins to set up the project.
repositories {
    mavenCentral()
}
Gradle gets dependencies from the maven repository.
dependencies {
    compile 'org.hibernate:hibernate-core:4.3.8.Final'
    compile 'mysql:mysql-connector-java:5.1.34'

    testCompile group: 'junit', name: 'junit', version: '4.+'
}
These commands compile hibernate, mysql and depending libraries for our Java project.
flyway {
    url = 'jdbc:mysql://localhost:3306'
    user = 'issuemanager'
    password = 'issuemanager'
    schemas = ['issuemanager']
}
Flyway task configuration section. Make sure to update these fields.
build.gradle - end
- Open
http://localhost/phpmyadmin, login and setup a user and a database with the same definitions. - On your command line run:
gradle build. This will download and compile all dependencies. - Run:
gradle eclipse. This will create the files required to import the project into eclipse. - Start eclipse and import the project. Don’t close the command line yet!
- Update the eclipse project structure according to the yellow marked files and directories showed below. Leave all the files except build.gradle empty.
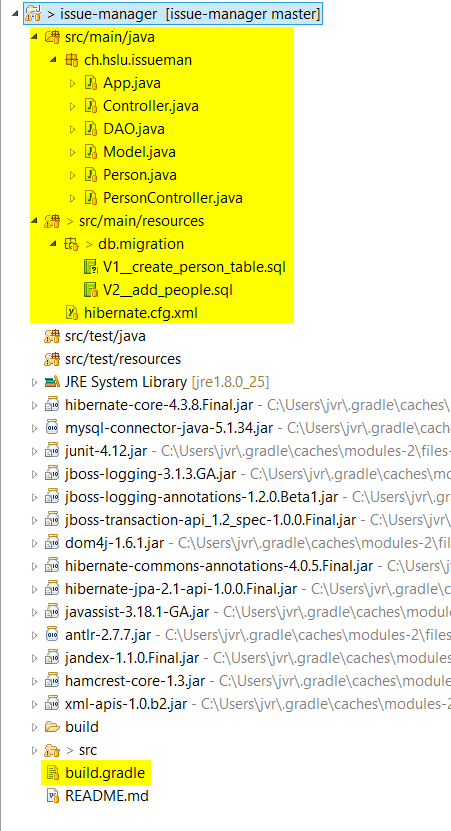
- Update the
*.sqlfiles with these statements:
V1__create_person_table.sql
create table person(
    id int NOT NULL AUTO_INCREMENT, PRIMARY KEY (id),
    name varchar(100) NOT NULL
);
This snippets creates the MySQL person table.
V2__add_people.sql.sql
insert into PERSON (NAME) values ('Axel');
insert into PERSON (NAME) values ('Mr. Foo');
insert into PERSON (NAME) values ('Ms. Bar');
This snippet adds people to the persons table.
- Switch back to your command line and run:
gradle flywayMigrate. This will create the person table according to your snippets.
If everything worked fine so far we are ready to write some code.
Coding - Controller
We will start with the DAO interface and the CRUD (create, read, update, delete) controller.
- Update the Data Access Object interface.
DAO.java
package ch.hslu.issueman;

import java.io.Serializable;
import java.util.List;

public interface DAO<T, Id extends Serializable> {

	public void persist(T t);
	public T getById(Id id);
	public List<T> getAll();
	public void update(T t);
	public void delete(T t);
	public void deleteAll();
}
This interface defines the functions required to communicate with the database later. As you can see we will use generics as we don’t want to create the same interface implementation for every model (despite we only have one model in this example).
- Update the basic Controller class.
I will split the controller in multiple snippets and explain what’s going on in detail.
Controller.java - start
package ch.hslu.issueman;

import java.io.Serializable;
import java.util.List;

import org.hibernate.Session;
import org.hibernate.SessionFactory;
import org.hibernate.Transaction;
import org.hibernate.boot.registry.StandardServiceRegistryBuilder;
import org.hibernate.cfg.Configuration;

public class Controller<T, Id extends Serializable> implements DAO<T, Id> {

	private final Class<T> clazz;
	private Session currentSession;
	private Transaction currentTransaction;

	protected Controller(Class<T> clazz) {
        this.clazz = clazz;
    }
clazzand the extended Controller constructor is a workaround to store the generic class type and retrieved it later.currentSessionis used to store a MySQL database access session.currentTransactionis helper to manage database commits.
public Session openCurrentSession() {
		currentSession = getSessionFactory().openSession();
		return currentSession;
	}
	public Session openCurrentSessionwithTransaction() {
		currentSession = getSessionFactory().openSession();
		currentTransaction = currentSession.beginTransaction();
		return currentSession;
	}
	public void closeCurrentSession() {
		currentSession.close();
	}
	public void closeCurrentSessionwithTransaction() {
		currentTransaction.commit();
		currentSession.close();
	}
	private static SessionFactory getSessionFactory() {
		Configuration configuration = new Configuration().configure();
		StandardServiceRegistryBuilder builder = new StandardServiceRegistryBuilder()
				.applySettings(configuration.getProperties());
		SessionFactory sessionFactory = configuration.buildSessionFactory(builder.build());
		return sessionFactory;
	}

	public Session getCurrentSession() {
		return currentSession;
	}
	public void setCurrentSession(Session currentSession) {
		this.currentSession = currentSession;
	}
	public Transaction getCurrentTransaction() {
		return currentTransaction;
	}
	public void setCurrentTransaction(Transaction currentTransaction) {
		this.currentTransaction = currentTransaction;
	}
These lines provide methods to interact with the hibernate session manager. Not very interesting also quite common.
Below you’ll see that we will use CurrentSession to read from the database and CurrentSessionwithTransaction for operations such as delete in the database.
	public void persist(T t) {
		openCurrentSessionwithTransaction();
		getCurrentSession().save(t);
		closeCurrentSessionwithTransaction();
	}

	public T getById(Id id) {
		openCurrentSession();
		@SuppressWarnings("unchecked")
		T t = (T) getCurrentSession().get(clazz, id);
		closeCurrentSession();
		return t;
	}

	@SuppressWarnings("unchecked")
	public List<T> getAll() {
		openCurrentSession();
		List<T> list = (List<T>) getCurrentSession().createQuery("from " + clazz.getName()).list();
		closeCurrentSession();
		return list;
	}

	public void update(T t) {
		openCurrentSessionwithTransaction();
		getCurrentSession().update(t);
		closeCurrentSessionwithTransaction();
	}

	public void delete(T t) {
		openCurrentSessionwithTransaction();
		getCurrentSession().delete(t);
		closeCurrentSessionwithTransaction();
	}

	public void deleteAll() {
		openCurrentSessionwithTransaction();
		List<T> people = getAll();
		for (T t : people) {
			delete(t);
		}
		closeCurrentSessionwithTransaction();
	}

	public void printToJson(List<T> l) {

		int size = l.size();
		System.out.println("[");
		for (T i : l) {
			System.out.println(((Model) i).toJson());
			if (--size != 0){System.out.print(",");}
		}
		System.out.print("]");
	}
}
This is the implementation of the DAO interface. Checkout the getAll method, there you’ll see how the class name workaround is used.
The console output of values is Json styled.
Controller.java - end
That’s it, this is our basic Controller that will be used by each Model Controller to interact with the database.
Coding - Model
Now you will see the allmighty power of hibernate. It never was easier to connect a model with a SQL table.
- Update the model interface.
Model.java
package ch.hslu.issueman;

public interface Model {
	public String toJson();
}
Easy but usefull. Every model has to implement the toJson method, because why not?
- Update the Person model with some special markup.
Person.java
package ch.hslu.issueman;

import javax.persistence.Column;
import javax.persistence.Entity;
import javax.persistence.GeneratedValue;
import javax.persistence.GenerationType;
import javax.persistence.Id;
import javax.persistence.Table;

@Entity
@Table(name="person")
public class Person implements Model{

	@Id
	@GeneratedValue(strategy=GenerationType.AUTO)
	@Column(name="id")
    private int id;

	@Column(name="name")
    private String name;

	public Person() {}

	public Person(String name) {
		setName(name);
	}

	public int getId() {
		return id;
	}

	public String getName() {
		return name;
	}

	public void setName(String name) {
		this.name = name;
	}

	public String toJson() {
		return "{\"id\": \"" + getId() + "\", \"name\":\"" + getName() + "\"}";
	}

}
Those @-Annotation will tell hibbernate which column belongs to which object attribute. Awesome! Isn’t it?
- Update the hibernate configuration file.
hibernate.cfg.xml
<?xml version="1.0" encoding="utf-8"?>
<!DOCTYPE hibernate-configuration SYSTEM
"http://www.hibernate.org/dtd/hibernate-configuration-3.0.dtd">

<hibernate-configuration>
   <session-factory>
   <property name="hibernate.dialect">org.hibernate.dialect.MySQLDialect</property>
   <property name="hibernate.connection.driver_class">com.mysql.jdbc.Driver</property>
   <property name="hibernate.connection.url">jdbc:mysql://localhost/issuemanager</property>
   <property name="hibernate.connection.username">issuemanager</property>
   <property name="hibernate.connection.password">issuemanager</property>
   <property name="show_sql">true</property>
   <property name="hibernate.current_session_context_class">thread</property>
   <mapping class="ch.hslu.issueman.Person"/>
</session-factory>
</hibernate-configuration>
Add the same values as already used to configure flyway. Very important is the mapping property which finalizes the mapping process of the model with database table.
Coding - App
This is the last coding part of the first tutorial.
- Update the Person Controller.
PersonController.java
package ch.hslu.issueman;

import java.util.List;

public class PersonController implements DAO<Person, Integer>{

	private static Controller<Person, Integer> controller;

	public PersonController() {
		controller = new Controller<Person, Integer>(Person.class);
	}

	public void persist(Person person) {
		controller.persist(person);
	}

	public Person getById(Integer id) {
		Person person = controller.getById(id);
		return person;
	}

	public List<Person> getAll() {
		List<Person> people = controller.getAll();
		return people;
	}

	public void update(Person person) {
		controller.update(person);
	}

	public void deleteById(Integer id) {
		controller.delete(controller.getById(id));
	}

	public void delete(Person person) {
		controller.delete(person);
	}

	public void deleteAll() {
		controller.deleteAll();
	}

	public void printToJson(List<Person> people) {
		controller.printToJson(people);
	}
}
As you can see the Person Controller uses the basic Controller to do some CRUD actions. Every model controller must implement the DAO interface and must use the basic Controller. This strategy allows us to define model depended actions within the CRUD methods.
- Update the application code.
App.java
package ch.hslu.issueman;

public class App {

	public static void main(String[] args) {

		PersonController PersonController = new PersonController();
//		PersonController.deleteAll();

//		Person person4 = new Person("Fyodor Dostoevsky");
//		Person person5 = new Person("Leo Tolstoy");
//		Person person6 = new Person("Jane Austen");
//
//		PersonController.persist(person4);
//		PersonController.persist(person5);
//		PersonController.persist(person6);

//		PersonController.deleteById(6);

//		person4.setName("Frodo");
//		PersonController.update(person4);

		PersonController.printToJson(PersonController.getAll());

		System.exit(0);
	}

}
This example application class shows how the Person Controller is used to retrieve and store Person object. Uncomment or comment sections to test the CRUD methods.
- Finally run the application.
You should see a lot of hibernate blabla and of course the Json outpout of the person table.
Hibernate: select person0_.id as id1_0_, person0_.name as name2_0_ from person person0_
[
{"id": "1", "name":"Axel"}
,{"id": "2", "name":"Mr. Foo"}
,{"id": "3", "name":"Ms. Bar"}
]
That was the first part of this tutorial and of course it was just a peek into these great tools. Hibernate offers much more possibilites to connect different models and do other awesome stuff. So don’t miss the documentation on their website or other tutorials. I hope to see you soon in the next chapter when we create a rich client application with JavaFX.
Update
2015-03-05: Part 2 has been released: https://janikvonrotz.ch/2015/03/05/superb-java-development-with-gradle-hibernate-flywaydb-javafx-and-eclipse-part-2/
Source
You can get the project from here: https://codeberg.org/janikvonrotz/issue-manager/releases/tag/v1.0
Category: software-developmentTags: application , flyway , gradle , hibernate , java , javafx , mysql , nginx
Edit Page / Show Statistic