
5 min read
Configure SAML Authentication for Nextcloud with Keycloack
Introduction
The complex problems of identity and access management (IAM) have challenged big companies and in result we got powerful protocols, technologies and concepts such as SAML, oAuth, Keycloack, tokens and much more.
The goal of IAM is simple. Centralize all identities, policies and get rid of application identity stores. Not only is more secure to manage logins in one place, but you can also offer a better user experience. As the title says we want to connect our centralized identity management software Keycloack with our application Nextcloud.
Nextcloud supports multiple modules and protocols for authentication. The one that is around for quite some time is SAML. It is complicated to configure, but enojoys a broad support.
The SAML authentication process step by step:
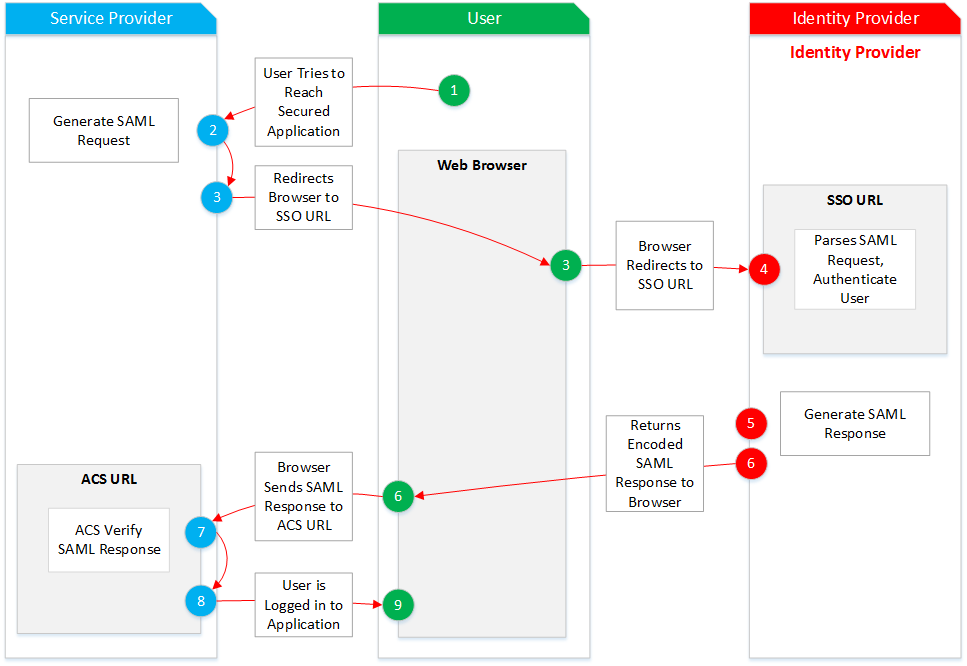
The service provider is Nextcloud and the identity provider is Keycloack.
In this guide the keycloack service is running as login.example.com and nextcloud as cloud.example.com.
Prepare Keycloack realm and key material
Navigate to the Keycloack console https://login.example.com/auth/admin/console
Create a new realm example.com.
Navigate to the keys tab and copy the Certificate content of the RSA entry to an empty texteditor. We require this certificate later on.
Open a shell and run the following command to generate a certificate.
openssl req -nodes -new -x509 -keyout private.key -out public.cert
This certificate will be used to identify the Nextcloud SP.
Setup Nextcloud
Open the Nextcloud app page https://cloud.example.com/index.php/settings/apps.
Install the SSO & SAML authentication app.
Navigate to Settings > Administration > SSO & SAML authentication and select Use built-in SAML authentication.
Then walk through the configuration sections below.
Global Settings
Select these options:
-
[ - ] Only allow authentication if an account exists on some other backend. (e.g. LDAP)
-
[ - ] Use SAML auth for the Nextcloud desktop clients (requires user re-authentication)
-
[ x ] Allow the use of multiple user back-ends (e.g. LDAP)
Allow use of multible user back-ends will allow to select the login method. You can disable this setting once Keycloak is connected successfuly.
For the IDP Provider 1 set these configurations:
General
Attribute to map the UID to: username
Optional display name: Login Example
The user id will be mapped from the username attribute in the SAML assertion.
Service Provider Data
x.509 certificate of the Service Provider: Copy the content of the public.cert file.
Private key of the Service Provider: Copy the content of the private.key file.
This certificate is used to sign the SAML request.
Identity Proivder Data
Identifier of the IdP: https://login.example.com/auth/realms/example.com
URL Target of the IdP where the SP will send the Authentication Request Message: https://login.example.com/auth/realms/example.com/protocol/saml
URL Location of IdP where the SP will send the SLO Request: https://login.example.com/auth/realms/example.com/protocol/saml
Public X.509 certificate of the IdP: Copy the certificate from the texteditor. You will need to add -----BEGIN CERTIFICATE----- in front of the key and -----END CERTIFICATE----- to the end of it.
This certificate is used to sign the SAML assertion.
Attribute mapping
Attribute to map the email address to.: email
Attribute to map the user groups to.: Role
The email address and role assignment are managed in Keycloack, therefor we need to map this attributes from the SAML assertion.
Security Settings
Check the following options:
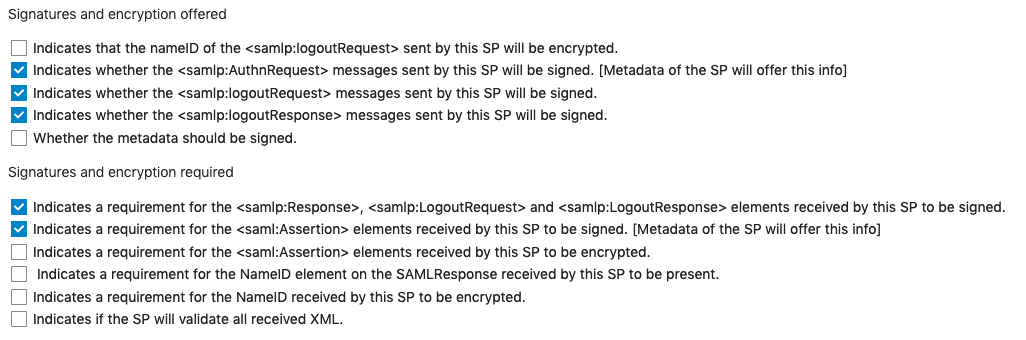
Validate the metadata and download the metadata.xml file.
We are ready to register the SP in Keycloack.
Register service provider
Open the Keycloack console again and select your realm. Navigate to Clients and click on the Create button.
Use the import function to upload the metadata.xml file.
Update the Client SAML Endpoint field with: https://login.example.com/auth/realms/example.com.
Then open the mappers tab.
Mappers
Create these mappers:
Name: username
Mapper Type: User Property
Property: username
Friendly Name: username
SAML Attribute Name: username
SAML Attribute NameFormat: Basic
Name: email
Mapper Type: User Property
Property: email
Friendly Name: email
SAML Attribute Name: email
SAML Attribute NameFormat: Basic
Name: roles
Mapper Type: Role List
Role attribute name: Roles
Friendly Name: Roles
SAML Attribute NameFormat: Basic
Single Role Attribute: On
In addition the Single Role Attribute option needs to be enabled in a different section. Navigate to Configure > Client scopes > role_list > Mappers > role_list and toggle the Single Role Attribute to On.
If these mappers have been created, we are ready to log in.
Test the login
First ensure that there is a Keycloack user in the realm to login with. Navigate to Manage > Users and create a user if needed. The following attributes must be set:
- Username
- Credentials
- Role Mappings
The role can be managed under Configure > Roles and then set in the user view under the Role Mappings tab. Or you can set a role per client under Configure > Clients > select client > Tab Roles.
In your browser open https://cloud.example.com and choose login.example.com. You will now be redirected to the Keycloack login page. Enter your credentials and on a successfull login you should see the Nextcloud home page.
Nextcloud will create the user if it is not available.
If you see the Nextcloud welcome page everything worked!
Troubleshooting
Debugging
Error logging is very restict in the auth process. Set 'debug' => true, in the Nextcloud config.php to get more details.
Source
Jörns Blog - Nextcloud SSO using Keycloak
stack overflow - SSO with SAML, Keycloak and Nextcloud
Category: identity-and-access-managementTags: keycloack , nextcloud , saml , authentication
Edit Page / Show Statistic