6 min read
Puppet masterless project setup guide
This document is a proposal for a Puppet project setup. It covers the setup of masterless Puppet module and provides a layout for a proper project structure. It will give you an example for a nginx module that can be deployed locally and remote. Further the roles and profiles concept will be applied and coupled with the hiera configuration data.
Requirements
Walking through this guide requires specific abilities and tools:
- Basic Puppet knowledge
- Working in a unix environment
- Access to a git repository
Also prepare the following values:
_PROJECT_NAME_: Name of the git repo
_GIT_REPO_URL_: Git repo url for pushing the project
And export them:
export _PROJECT_NAME_="value"
export _GIT_REPO_URL_="value"
Project Setup
Install Puppet and Git on your development machine.
yum install puppet git -y
Make sure at least Puppet version 5 has been installed
Optional:
Create a git repository and push an initial commit.
mkdir ~/$_PROJECT_NAME_
git init
touch README.md
git add .
git commit -m "init"
git remote add origin $_GIT_REPO_URL_
git push -u origin master
Initial Puppet Module
Next we are going to create a folder and file structure for a dummy module.
cd ~/$_PROJECT_NAME_
mkdir -p ./modules/foo/files/
echo "hello world" > ./modules/foo/files/hello
mkdir -p ./modules/foo/manifests/
touch ./modules/foo/manifests/init.pp
mkdir ./manifests/
echo "include foo" > ./manifests/site.pp
Add the following definitions to the init.pp file
init.pp
class foo {
  file { "/tmp/hello":
    ensure => file,
    source => "puppet:///modules/foo/hello",
  }
}
We added a Puppet module named foo that creates a file and is included in our site.pp.
The Puppet code can be executed with the following command:
puppet apply --modulepath modules manifests/site.pp
You should find a file /tmp/hello with content hello world.
If everything worked, we are ready to extend the project structure.
Hiera Files
Based on facts (Puppet environment variables) we assign to a node (host) our Puppet setup should load specific configurations and apply them to modules. The Puppet hiera concept helps us achieving that.
First you need to now about facts.
Facts are key values that are available to Puppet by default.
Show all available facts by running facter.
Create a custom fact: export FACTER_environment="dev"
Show the custom fact: facter environment
Simple isn’t it?
Depending on these facts and the Puppet configuration our project should load specific configuration data. The configuration data structure is organized as a hierarchy.
Our configuration hierarchy will consist of three levels:
- common: Data loaded by default.
- environment: Data assigned to an environment.
- node: Data assigned to a host.
Create the folder structure and files for the hierarchy.
cd ~/$_PROJECT_NAME_
mkdir -p ./data/$(facter environment)/nodes/
touch ./data/common.yaml
touch ./data/$(facter environment)/default.yaml
touch ./data/$(facter environment)/nodes/$(facter hostname).yaml
touch hiera.yaml
Update the hiera configuration file.
hiera.yaml
---
version: 5

defaults:
  data_hash: yaml_data
  datadir: data

hierarchy:
  - name: "Per-node data"
    path: "%{facts.environment}/nodes/%{facts.hostname}.yaml"

  - name: "Per-environment defaults"
    path: "%{facts.environment}/default.yaml"

  - name: "Common data"
    path: "common.yaml"
The hiera file implements the mentioned data hierarchy.
Now we are going to set configurations for our data hierarchy.
data/common.yaml
nginx::port: 80
data/dev/default.yaml
nginx::host: default_server
data/dev/nodes/_HOSTNAME_.yaml
nginx::welcome_message: "hello world"
This configuration data will be applied to the nginx module.
Nginx Module
Create the nginx module folders and files.
cd ~/$_PROJECT_NAME_
mkdir -p ./modules/nginx/manifests/
touch ./modules/nginx/manifests/init.pp
mkdir -p ./modules/nginx/templates/
touch ./modules/nginx/templates/index.html.epp
touch ./modules/nginx/templates/nginx.conf.epp
echo "include nginx" > ./manifests/site.pp
Add resources to the nginx module.
init.pp (nginx)
class nginx (
  Integer $port,
  String $host,
  String $welcome_message,
) {

  package { "nginx":
    ensure => installed,
  }

  service { "nginx":
    ensure => running,
  }

  file { "/usr/share/nginx/html/index.html":
    ensure  => present,
    content => epp("nginx/index.html.epp"),
  }

  file { "/etc/nginx/nginx.conf":
    ensure  => present,
    content => epp("nginx/nginx.conf.epp"),
    notify => Service['nginx'],
  }
}
Update the index.html template.
index.html
<!DOCTYPE html PUBLIC "-//W3C//DTD XHTML 1.1//EN" "http://www.w3.org/TR/xhtml11/DTD/xhtml11.dtd">

<html xmlns="http://www.w3.org/1999/xhtml" xml:lang="en">
  <head>
    <title>Test Page for the Nginx HTTP Server</title>
    <meta http-equiv="Content-Type" content="text/html; charset=UTF-8" />
  </head>

  <body>
    <h1>Welcome to <strong>nginx</strong></h1>
    <p><%= $nginx::welcome_message %></p>
  </body>
</html>
Update the nginx conf template.
nginx.conf
user nginx;
worker_processes auto;
error_log /var/log/nginx/error.log;
pid /run/nginx.pid;

include /usr/share/nginx/modules/*.conf;

events {
    worker_connections 1024;
}

http {
    log_format  main  '$remote_addr - $remote_user [$time_local] "$request" '
                      '$status $body_bytes_sent "$http_referer" '
                      '"$http_user_agent" "$http_x_forwarded_for"';

    access_log  /var/log/nginx/access.log  main;

    sendfile            on;
    tcp_nopush          on;
    tcp_nodelay         on;
    keepalive_timeout   65;
    types_hash_max_size 2048;

    include             /etc/nginx/mime.types;
    default_type        application/octet-stream;

    include /etc/nginx/conf.d/*.conf;

    server {
        listen       <%= $nginx::port %> <%= $nginx::host %>;
        listen       [::]:<%= $nginx::port %> <%= $nginx::host %>;
        server_name  _;
        root         /usr/share/nginx/html;

        include /etc/nginx/default.d/*.conf;

        location / {
        }

        error_page 404 /404.html;
            location = /40x.html {
        }

        error_page 500 502 503 504 /50x.html;
            location = /50x.html {
        }
    }
}
And finally install everything.
puppet apply --modulepath modules manifests/site.pp --debug --hiera_config hiera.yaml
Open your browser to http://localhost:80/.
Roles and Profiles
Having multiple modules, shared resources and dependencies comes at cost of complexity. Thus Puppet came up with the roles and profiles concept.
The official documentation explains the key idea very well:
Roles and profiles are two extra layers of indirection between your node classifier and your component modules. This separates your code into three levels:
- Component modules: Normal modules that manage one particular technology. (For example, puppetlabs/apache.)
- Profiles: Wrapper classes that use multiple component modules to configure a layered technology stack.
- Roles: Wrapper classes that use multiple profiles to build a complete system configuration.
And here is a visual presentation:
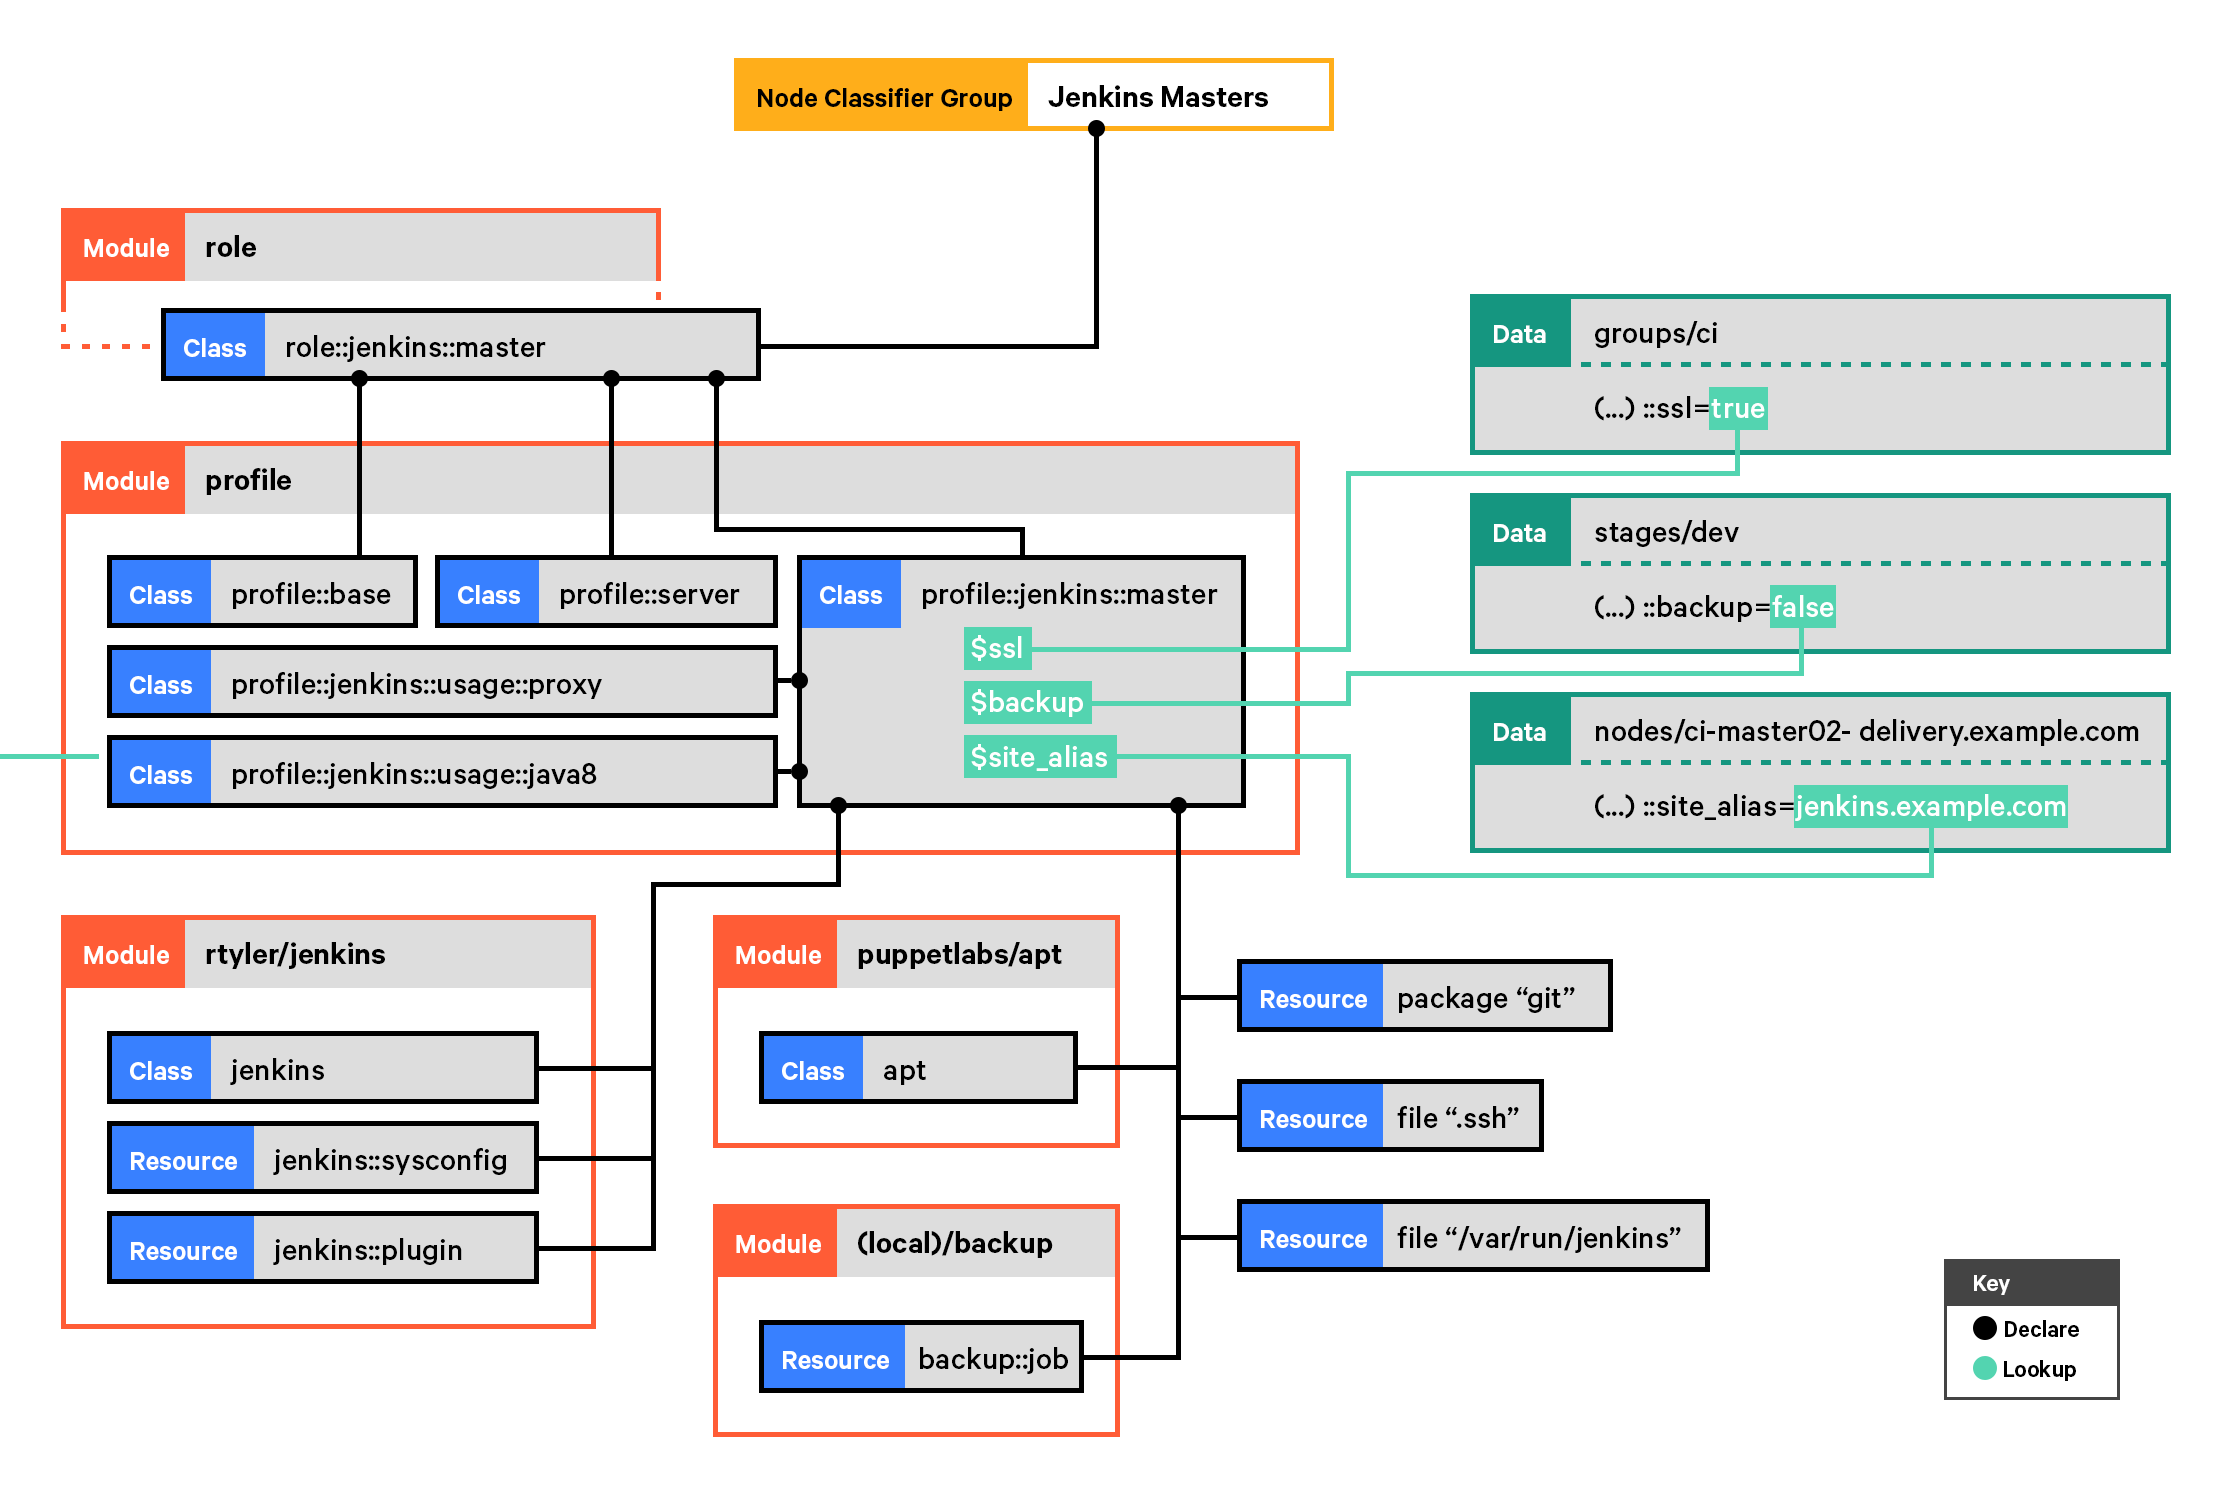
Further roles and profiles allow us to decouple Puppet modules from the hiera config.
Create the profile and role files.
cd ~/$_PROJECT_NAME_
mkdir -p ./modules/profile/manifests
mkdir -p ./modules/role/manifests
touch ./modules/profile/manifests/nginx.pp
touch ./modules/role/manifests/webserver.pp
Further to make things a bit more interesting create a new module.
mkdir -p ./modules/base/manifests
touch ./modules/base/manifests/init.pp
init.pp (base)
class base (
  String $username,
) {
  user { $username:
    ensure => present,
  }
}
The profile contains multiple modules. Update the nginx profile as followed:
nginx.pp
class profile::nginx (
  Integer $port = '80',
  String $host = 'default_server',
  String $welcome_message = 'hello world',
) {

  class { "base":
    username => "dummy",
  }

  class { "nginx":
    port => $port,
    host => $host,
    welcome_message => $welcome_message,
  }
}
The profile helps to decouple modules from the hiera config.
A role includes multiple profiles and modules.
webserver.pp
class role::webserver {
  include foo
  include profile::nginx
}
In roles only include modules that do not need any configuration.
Update the hiera data with profile configuration keys.
data/common.yaml
profile::nginx::port: 81
data/dev/default.yaml
profile::nginx::host: default_server
data/dev/nodes/_HOSTNAME_.yaml
profile::nginx::welcome_message: "how are you?"
The hiera data will be looked up by the profile and applied to the nginx module.
As a final step assign the role to the default node.
site.pp
node default {
  include role::webserver
}
Run the new setup.
puppet apply --modulepath modules manifests/site.pp --debug --hiera_config hiera.yaml
Open your browser to http://localhost:81/.
And we are done 😄 Now you have masterless Puppet project up and running.
I hope you enjoyed this tutorial, if not let me know. Feel free to ask questions.
Source
Puppefy IT Automation - How To Set Up a Masterless Puppet on CentOS
GitHub Gist - Simplest example of a masterless puppet invocation using module paths
Puppet Ask - Masterless puppet with hiera dynamic lookup?
GitHub - Puppet Simple Masterless
ScaleScale - How to install Nginx on CentOS 6 / RHEL
Category: software-configuration-managementTags: puppet , deployment , nginx , masterless
Edit Page / Show Statistic