4 min read
Build a Java 3-tier application from scratch – Part 3: Object-relational mapping
Welcome to third part of my 3-tier application tutorial. Within this and the next part we are going to develope simple webservice that communicates with the database and maps Java objects to data tables. We will create a controller that communicates with our MySQL database using the EclipseLink ORM to abstract this process.
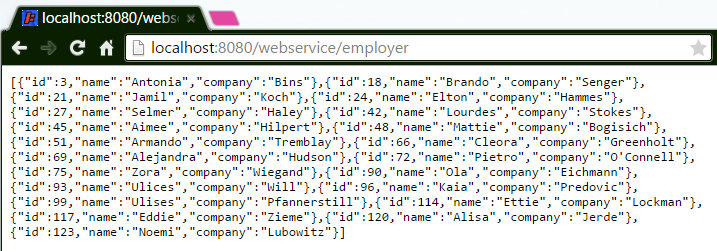
Here’s a picture of what we want to achieve. A simple webservice that’s serves depending on the url an array of json data.

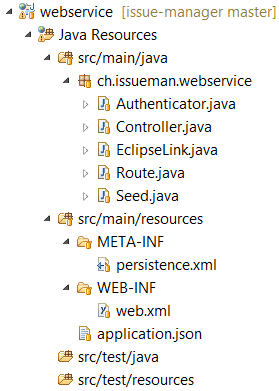
Let’s get started with the file structure. Create all the files, packages and directories as showed below.

In this tutorial I won’t show you how can install and configure a MySQL server. It’s expected that you already have a running server and a prepared database.
EclipseLink ORM
Instead of the common property file our application stores settings in a json file.
- Update the
applicaton.jsonfile.
application.json
{
  "javax": {
    "persistence": {
      "jdbc": {
        "driver": "com.mysql.jdbc.Driver",
        "url": "jdbc:mysql://localhost/issuemanager",
        "user": "issuemanager",
        "password": "issuemanager"
      }
    }
  },
  "eclipselink": {
    "logging": {
      "level": "off"
    },
    "ddl-generation": {
    	"value": "create-tables",
    	"output-mode": "database"
	}
  }
}
Make sure the update the jdbc url, user and password property.
As next we will create the
EntityFactorywhich allows us to access the database with plain simple java objects.
EclipseLink.java
package ch.issueman.webservice;

import java.util.HashMap;
import java.util.Map;

import javax.persistence.EntityManager;
import javax.persistence.EntityManagerFactory;
import javax.persistence.Persistence;

import com.typesafe.config.Config;
import com.typesafe.config.ConfigFactory;

public class EclipseLink {

	private static EntityManagerFactory emf = null;

	static {
		try {
			Config config = ConfigFactory.load();
			Map<String, String> properties = new HashMap<String, String>();
			properties.put("javax.persistence.jdbc.driver", config.getString("javax.persistence.jdbc.driver"));
			properties.put("javax.persistence.jdbc.url", config.getString("javax.persistence.jdbc.url"));
			properties.put("javax.persistence.jdbc.user", config.getString("javax.persistence.jdbc.user"));
			properties.put("javax.persistence.jdbc.password", config.getString("javax.persistence.jdbc.password"));
			properties.put("eclipselink.ddl-generation.output-mode", config.getString("eclipselink.ddl-generation.output-mode"));
			properties.put("eclipselink.logging.level", config.getString("eclipselink.logging.level"));
			properties.put("eclipselink.ddl-generation", config.getString("eclipselink.ddl-generation.value"));

			emf = Persistence.createEntityManagerFactory("issue-manager", properties);
		} catch (Throwable e) {
		}
	}

	public static EntityManagerFactory getEntityManagerFactory() {
		return emf;
	}

	public static EntityManager getEntityManager() {
		return emf.createEntityManager();
	}
}
Based on our persistence.xml file and configure with the application.json file this class stores a static instance of the EclipseLink entity factory.
- As next update the persistence configuration file.
persistence.xml
<?xml version="1.0" encoding="UTF-8"?>
<persistence version="2.0" xmlns="http://java.sun.com/xml/ns/persistence" xmlns:xsi="http://www.w3.org/2001/XMLSchema-instance" xsi:schemaLocation="http://java.sun.com/xml/ns/persistence http://java.sun.com/xml/ns/persistence/persistence_2_0.xsd">
	<persistence-unit name="issue-manager" transaction-type="RESOURCE_LOCAL">

		<provider>org.eclipse.persistence.jpa.PersistenceProvider</provider>

        <class>ch.issueman.common.Person</class>
        <class>ch.issueman.common.User</class>
        <class>ch.issueman.common.Employer</class>
        <class>ch.issueman.common.Project</class>
        <class>ch.issueman.common.Comment</class>

		<exclude-unlisted-classes>false</exclude-unlisted-classes>

	</persistence-unit>

</persistence>
You might come along other persistence files with far more properties, but that’s actually all we need as we use a different (better) approach to configure EclipseLink.
When working with the MVC model you have to implement a controller to communicate with the database and to apply business logic. So does our application. Based on the DAO interface our controller uses the entity manager does common CRUD actions with the models. As we don’t want to write a controller for each model our controller uses generic types. This might confuse you at the beginning, but it will be more obvious when we instance the model controllers.
- Now update the controller class.
Controller.java
package ch.issueman.webservice;

import java.io.Serializable;
import java.util.List;

import javax.persistence.EntityManager;
import javax.persistence.TypedQuery;

import ch.issueman.common.DAO;

public class Controller<T, Id extends Serializable> implements DAO<T, Id> {

	private EntityManager em = null;
	private final Class<T> clazz;

	public Controller(Class<T> clazz) {
		this.clazz = clazz;
		em = EclipseLink.getEntityManager();
	}

	public void persist(T t) {
		em = EclipseLink.getEntityManager();
		em.getTransaction().begin();
		em.persist(t);
		em.getTransaction().commit();
		em.close();
	}

	public T getById(Id id) {
		em = EclipseLink.getEntityManager();
		return em.find(clazz, id);
	}

	public List<T> getAll() {
		em = EclipseLink.getEntityManager();
		return (List<T>) ((TypedQuery<T>) em.createQuery("SELECT t FROM " + clazz.getSimpleName() + " t", clazz)).getResultList();
	}

	public void update(T t) {
		em = EclipseLink.getEntityManager();
		em.getTransaction().begin();
		em.merge(t);
		em.getTransaction().commit();
		em.close();
	}

	public void delete(T t) {
		em = EclipseLink.getEntityManager();
		em.getTransaction().begin();
		em.remove(em.merge(t));
		em.getTransaction().commit();
		em.close();
	}

	public void deleteAll() {
		em = EclipseLink.getEntityManager();
		em.getTransaction().begin();
		em.createQuery("DELETE FROM " + clazz.getSimpleName() + " t").executeUpdate();
		em.getTransaction().commit();
		em.close();
	}
}
Wow, that was a lot of code, confused yet? I will explain the most important code lines.
- The clazz variable stores the model type. This is actually a workaround so we can access the model class properties such as its name.
- Every action that alters data (persist, delete, update) must call the Transaction manager in order to commit the changes.
- The query in the in the
getAll()anddeleteAll()method is not SQL, it’s JPQL (Java Persistence Query Language).
Very well, now we’ve set up everything to use the advanced features of an ORM. Next we are going to configure the webservice.
Update
- 2015-01-04: Improved the controller by shorten the transactional methods.
Links
- Part 1: Introduction and project setup
- Part 2: Model setup
- Part 3: Object-relational mapping
- Part 4: Webservice
- Part 5: Client controller
- Part 6: Client view
Source
Feedback from Reddit on this post
Categories: Software developmentTags: three tier , application , authentication , authenticator , faker , java , jax-rs , restful , seeder
Edit this page
Show statistic for this page