5 min read
Build a Java 3-tier application from scratch - Part 1: Introduction and project setup
Welcome to my first post of the Java 3-tier application tutorial. In this tutorial I will tell show how you can develope a Model-View-Controller based Java desktop and server application using the latest tools and frameworks.
This tutorial uses advanced techniques and programming paradigms, make sure to meet at least the following requirements:
- MySQL Database design and administration
- Eclipse development
- Java classes, interfaces and generics
- MVC programming concept
- ORM techniques
- JAX-RS with jackson aka RESTeasy with JSON
- Restful webservices
- CRUD Data access object
- Booo to XML, hail to JSON
- Gradle build and task scripts
I also recommend to finish my other tutorial first (if not done yet): Superb Java development with Gradle, Hibernate, FlywayDB, JavaFX and Eclipse Part 1 and Part 2.
To accomplish this tutorial you will need several development tools and frameworks.
I will definitely use these programs:
- Eclipse: The development IDE recommended for this tutorial.
- MySQL server: OpenSource database server.
- Gradle: A task runner and package manager for your Java project (in case you’re a web developer that would be bower and grunt).
- JavaFX Scene Builder Tool to create user interfaces.
Architecture
Our strategy for this project is quite simple. EclipseLink will communicate with the database and acts as our ORM, JAX-RS is used to create our JSON restful webservice and JavaFX is the framework for our client app. Below is a picture that shows our Architecture, the commuication flow and where we use 3rd party libraries.
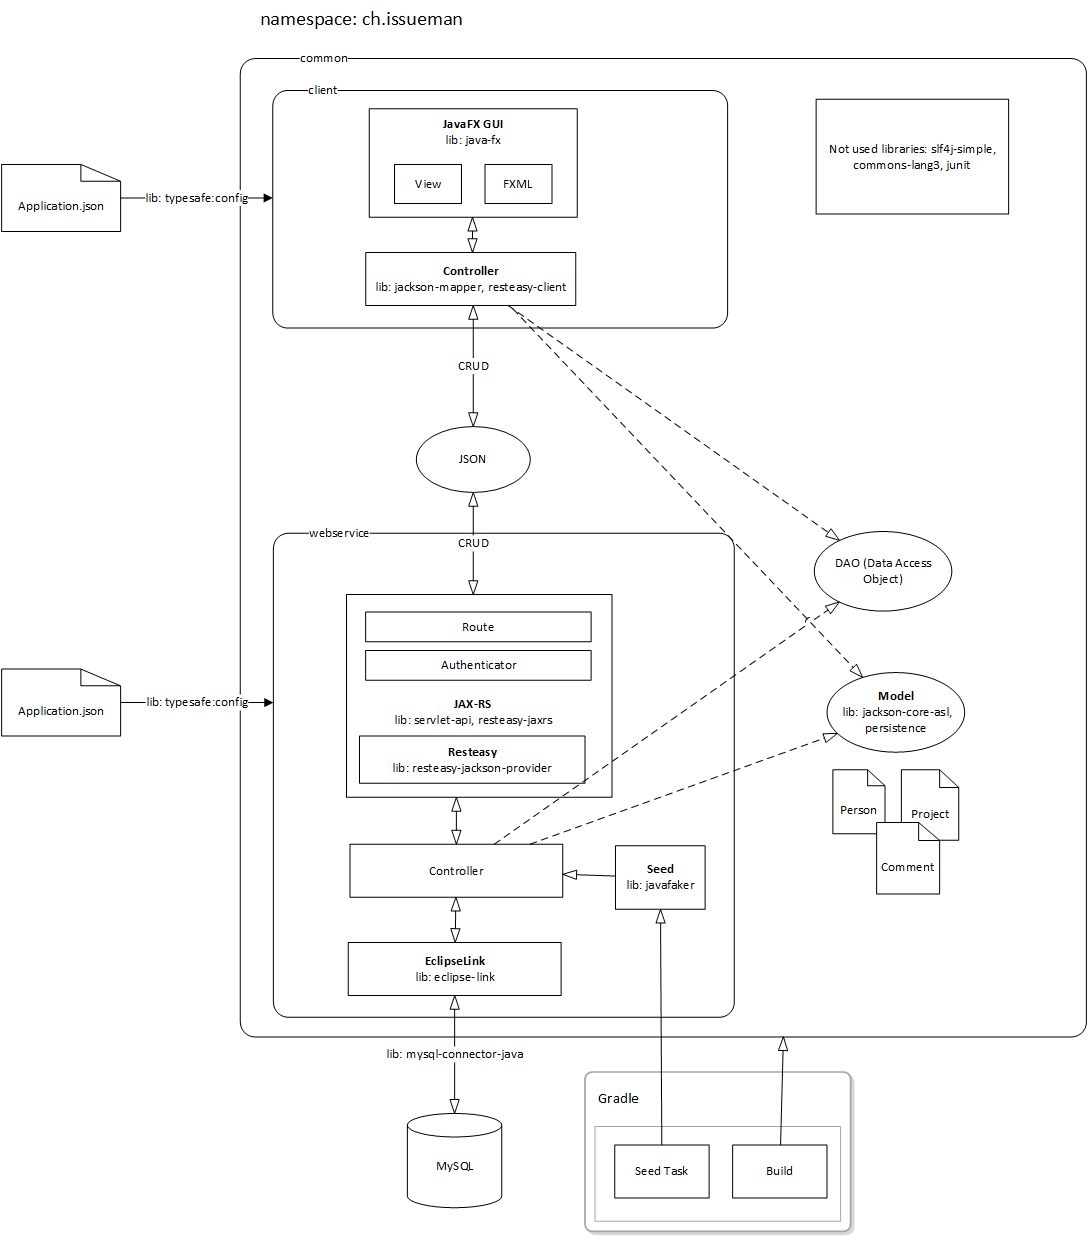
Our application architecture consists of 3 eclipse projects:
- client: Thin app to interact with the application
- webservice: Communicates with the database and serves the REST interfaces.
- common: Components used by both projects.
Project setup
Now we are going to set up these 3 projects with gradle.
- Create a project folder
/../<project>somewhere on your drive. - To this folder add 3 more directories:
common,webserviceandclient. - In the project folder and within these 3 directories add a
build.gradlefile. - Add a second file called
settings.gradleto the project folder. - Open your command line and navigate to the project folder:
cd <project>. - Update the file content as showed below.
settings.gradle
include ":common", ":webservice", ":client"
This file will tell gradle that we work with a multiproject setup.
build.gradle
subprojects {

  apply plugin: "java"
  apply plugin: "eclipse"

  repositories {
    mavenCentral()
  }

  configurations {
    lombok
  }

  dependencies {
     testCompile 'junit:junit:4.+'
     compile 'org.projectlombok:lombok:1.+'
     lombok 'org.projectlombok:lombok:1.+'
  }

  // install lombok for Eclipse

  sourceSets.each{ sourceSet ->
    sourceSet.compileClasspath += configurations.lombok
    sourceSet.ext.delombok = new File(buildDir, "generated-src/delombok/" + sourceSet.name);
  }

  task installLombok() {
    dependsOn configurations.lombok
  } << {
      File jarFile = null;
      configurations.lombok.resolvedConfiguration.resolvedArtifacts.find {
          if ("lombok".equals(it.name)) {
              jarFile = it.file;
          }
      }
      javaexec {
          main="-jar"
          args = [
              jarFile,
              "install",
              "auto"
          ]
      }
  }
  eclipseProject.dependsOn installLombok

  // install lombok for Javadoc

  task delombok() {
    dependsOn configurations.compile
    dependsOn configurations.lombok
  } << {
      File jarFile = null;
      configurations.lombok.resolvedConfiguration.resolvedArtifacts.find {
          if ("lombok".equals(it.name)) {
              jarFile = it.file;
          }
      }
      sourceSets.each{ sourceSet ->
          def classPath = sourceSet.compileClasspath.files.join(";")
          def delombokPath = sourceSet.ext.delombok
          delombokPath.mkdirs();
          javaexec {
              main = "-jar"
              args jarFile, "delombok"
              if (!classPath.empty) {
                  args "-c", classPath
              }
              args "-d", delombokPath
              args sourceSet.allJava.srcDirs
          }
      }
  }

  javadoc {
      dependsOn delombok
      source = sourceSets.main.ext.delombok
  }
}
This is the master gradle build file and contains definition for each subproject. The java and eclipse plugin allows us to import the 3 projects into Eclipse as a Java project. Maven central is our main repository, this is the provider where we download our libraries. Within this project we will make use of project lombok. This project intends to get rid of the implementation process of getter and setter methods by generating them with annotations. You will see in the next chapter how this works.
common/build.gradle
dependencies {
  compile 'org.eclipse.persistence:javax.persistence:2.+'
  compile 'org.eclipse.persistence:eclipselink:2.+'

  compile 'org.codehaus.jackson:jackson-core-asl:1.+'
  compile 'org.codehaus.jackson:jackson-mapper-asl:1.+'

  compile 'org.jboss.resteasy:resteasy-jaxrs:3.+'
  compile 'org.jboss.resteasy:resteasy-jaxb-provider:3.+'
  compile 'org.jboss.resteasy:resteasy-client:3.+'

  compile 'org.apache.commons:commons-lang3:3.+'
  compile 'com.typesafe:config:1.+'
  compile 'org.slf4j:slf4j-simple:1.+'
  compile 'com.github.javafaker:javafaker:0.+'
}
Both application components going to use these libraries: EclipseLink: ORM for Java. jackson core: Core components of jackson to parse JSON data. jackson mapper: Convert between POJO and JSON. RESTeasy client: client api to consume the webservice. RESTeasy: JAX-RS implementation to develop RESTful client and server applications. Apache Commons: popular and reusable Java components. Typesafe Config: JVM configuration library. Java Faker: library to create fake data.
webservice/build.gradle
apply plugin: 'jetty'

dependencies {
  compile project(':common')
  compile 'mysql:mysql-connector-java:5.+'
  compile 'org.jboss.resteasy:resteasy-jackson-provider:2.+'
  providedCompile 'javax.servlet:javax.servlet-api:3.+'
}

jettyRun.webAppSourceDirectory = file("src/main/resources")

task seed(type:JavaExec) {
   main = 'ch.issueman.webservice.Seed'
   classpath = sourceSets.main.runtimeClasspath
}
Jetty is our application server, instead of the default webapp folder we will use the resources folder to configure the application. The MySQL connector is the database driver for EclipseLink. The custom seed task allows us to execute the main method of our Seed class.
client/build.gradle
dependencies {
  compile project(':common')
}
The client uses common dependencies only.
- Run two gradle tasks on the command line.
gradle build: This will build the Java application project.gradle eclipse: Creates the required files such as.projectto import the projects into eclipse.
- Finally set the workspace path of eclipse to the folder that contains the
<project>directory and import the projects within the<project>folder.
Congratulation you’ve finished the first part of this tutorial. Can’t wait to see you in the next part ;)
Update
- 2015-03-28: I’ve replaced Hibernate with EclipseLink and dropped FlywayDB as we create the database with EclipseLink.
- 2015-04-01: Added project lombok to eclipse and and project dependencies.
Links
Here are all links to the other parts of this tutorial.
- Part 1: Introduction and project setup
- Part 2: Model setup
- Part 3: Object-relational mapping
- Part 4: Webservice
- Part 5: Client controller
- Part 6: Client view
Source
Several Java tutorials from Mykong.com
How do I use Lombok with Eclipse, Gradle, and Javadocs?
Tags: three tier , application , eclipse , gradle , hibernate , java , javafx , mvc , mysql , project , tutorial
Improve this page
Show statistic for this page